

How To Clear Onedrive Space
 As mentioned in earlier posts, the majority of my colleagues have 2 GB of storage space in their OneDrive and some struggle to stay within those limits.
So, we are currently helping them with cleaning up and giving them some tips on how to keep within boundaries. It may be interesting for you as well!
1. Empty the Recycle Bin
You may want to start with a clean slate, so let's empty the Recycle Bin first. If, during cleaning, you accidentally delete too much, you will have fewer documents to search through for restoring. Also, emptying the recycle bin will free up space!

2. Check the size of your OneDrive
It helps to know how much stuff you have, and how much you need to remove. So, click on the Gear wheel top right, click "OneDrive settings" and then select "More settings". You will pass a useful screen with notification options – worth looking at but out of scope for this post.
Then click "Storage metrics".

On the next page you will see the lists in your OneDrive site collection (it is a SharePoint site collection, after all) and the amount of free space is shown top right.

3. Move shared documents to SharePoint or Teams
Sharing documents in OneDrive to collaborate on is great as long as the document is not final. Once it is final, please move it to a SharePoint site so it can be part of the team's collective knowledge and make room in your OneDrive.
Do not hoard shared OneDrive documents – if you leave the organization your OneDrive will disappear with all its content. (After a period when your manager can access it.) We frequently get questions about lost shared documents as many people appear not to be aware of this. 😦
So, check out which documents you share and with whom. Do you still need them at all? Do you still need to share them or are they ready to live elsewhere?

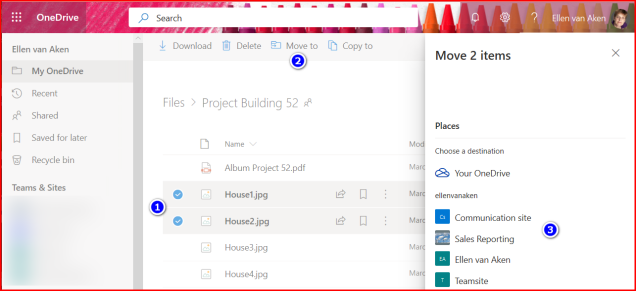
If you want to move the documents to SharePoint, go back to your "My One Drive" section, select them and then click "Move To" from the grey bar and select the SharePoint site where they will live. (Make sure you follow that site so it appears as one of your first choices). The documents will be deleted from your OneDrive in the process. (If you want to know how Copy To and Move To work, read my earlier post and also my post about the risks)
If you have many documents to move, you may either want to do it in smaller batches or use Copy To and delete the documents after you have checked that they have all safely arrived at their SharePoint destination.
And if you no longer need the documents you share, you can just delete them.
4. Create or Request a SharePoint or Teams site
In case you have no location at your disposal, create or request a SharePoint site or a Team (which comes with a SharePoint site) so you can share documents with your project team or department.
5. Find the largest and the oldest documents
Unfortunately you will have to do this by folder, as you can not create views without folders. Although OneDrive is a SharePoint site, it misses some cool SharePoint functionality, such as the option to add metadata columns and create views, or the possibility to add templates. (note to self: submit to User Voice 🙂 )
The following paragraph has been added in May 2020:
* Please be aware that Microsoft365 adds folders to your OneDrive when you use certain applications. The "Attachments" folder to store email attachments is one, but Apps (contains Forms documents), Microsoft Teams Data, Microsoft Teams Chat files and Pictures can also contain a lot of documents that you may not be aware of. Read my post on this topic*
Open a folder and click on the pull-down arrow next to the File size column and click on "Larger to smaller". Determine whether the largest files need to stay on your OneDrive. They may fit on your SharePoint or Teams site as well, so you can Move them there, or perhaps they can be deleted.

Then sort for the oldest documents by clicking the pull-down arrow next to the Modified column and selecting "Older to newer". Generally you will have accumulated quite a lot of documents in your career. When projects have been completed or interest has waned, you might as well move them to a SharePoint archive site, a records center (in that case they should have been moved there long ago!) or delete them.
6. Remove versions
This can make sense for very large documents that you have worked on intensively and that you want to keep. There may be several versions that take up space.
Select the document, click the … to the right of the name, and select "Version History" from the menu.

You will now see the versions.
If you are still working on the document, it may be safer to remove the oldest versions only.

If your document is final, you can delete all versions and keep the latest version only. If there are many versions involved, the quickest route is to go to the Storage Metrics (see par. 2), click on "Documents" and drill down until you see the document.

Click "Version history" on the right of the document and then you will see an option to delete all versions in one go, leaving the last one.

7. Move private files to a personal location
While it is all too common to have a mix of private and organizational docs on your systems, your OneDrive is primarily meant for organizational stuff. Your private info should not be here, especially if it takes up valuable storage space. You also do not want to lose it when you leave the organization, right? So, move your personal files and photo's to your private OneDrive (now with extra-secure Personal Vault), iCloud, Google Drive, a USB stick or another place.
8. Empty the Recycle Bin and check storage
Hopefully this has helped you get below that 2 GB. If you, you need to repeat and be a little more strict this time around!
9. Repeat regularly
In order to stay below the limit, go through these steps again on a regular basis.
Do you have tips?
Do you have experience with colleagues whose OneDrive fills up quickly? Any suggestions that we can use?
How To Clear Onedrive Space
Source: https://mydigitalworkplace.wordpress.com/2020/01/26/9-steps-to-clean-up-onedrive/
Posted by: phillipspritioneatch.blogspot.com
0 Response to "How To Clear Onedrive Space"
Post a Comment